HSTS Includesubdomains: Secure Your Entire Domain
HSTS includesubdomains: Secure Your Entire Domain
Hey everyone! Today, we’re diving deep into a super important security feature for your website:
HTTP Strict Transport Security
, or
HSTS
for short. Specifically, we’ll be unpacking the magic behind the
includesubdomains
directive. You know, that little addition that can make a
huge
difference in how secure your entire online presence is. If you’re running a website, especially one with subdomains (and who isn’t these days, right?), you’re going to want to pay attention to this. We’re talking about beefing up your defenses, preventing sneaky man-in-the-middle attacks, and ensuring your users’ data stays locked down tighter than a drum. So, grab your favorite beverage, get comfy, and let’s break down why
includesubdomains
is a game-changer for your web security strategy.
Table of Contents
Understanding the Basics: What is HSTS, Anyway?
Before we get our hands dirty with
includesubdomains
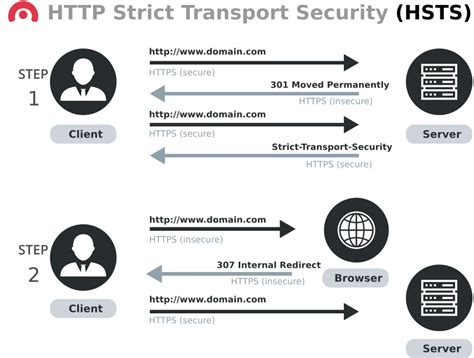
, let’s quickly recap what HSTS is all about. At its core,
HSTS is a web security policy mechanism that helps protect websites against protocol downgrade attacks and cookie hijacking
. Essentially, it tells web browsers (like Chrome, Firefox, Safari, you name it!) that they should
only
interact with your website using a secure HTTPS connection, and
never
over the insecure HTTP protocol. Think of it like a strict bouncer at your website’s club, only allowing guests with the proper, secure credentials (HTTPS) to enter. Once a browser receives an HSTS header from your server, it remembers this instruction for a specified period (defined by the
max-age
directive). The next time you try to visit your site, the browser will automatically upgrade any HTTP requests to HTTPS before even sending them out. This is HUGE, guys, because it prevents those initial insecure requests that could be intercepted. It’s a proactive measure that significantly reduces the attack surface for common vulnerabilities. Without HSTS, a user might accidentally click an HTTP link or type
http://
into their browser, leaving them vulnerable to various man-in-the-middle attacks where an attacker could snoop on or even alter the traffic. HSTS eliminates this risk by enforcing the secure path from the get-go. It’s like putting up a permanent sign that says, “This way to security only!”
The Power of
includesubdomains
Explained
Now, let’s talk about the star of the show: the
includesubdomains
directive. When you implement HSTS on your main domain (like
example.com
), it tells browsers to
always
use HTTPS for
example.com
. But what about all those other services you might be running on subdomains? We’re talking about
blog.example.com
,
shop.example.com
,
api.example.com
, or even those quirky ones like
dev.example.com
. If you
don’t
use
includesubdomains
, your HSTS policy only applies to the base domain. This means that browsers will still happily connect to your subdomains over HTTP if they’re not explicitly configured with their own HSTS policies. This is a massive security loophole! An attacker could exploit this by targeting one of your less secured subdomains, performing an attack there, and potentially gaining access to your main domain or sensitive user data. It’s like having a fortress with a strong main gate but leaving all the side entrances wide open. That’s where
includesubdomains
swoops in to save the day. By adding
includesubdomains
to your HSTS header, you’re telling browsers, “Hey, this strict HTTPS rule? It applies to the main domain
and all of its subdomains too
!” This ensures that
every single part
of your online presence, no matter how small or seemingly insignificant, is protected by the HSTS policy. It’s a comprehensive security blanket that prevents attackers from finding a weak spot in your subdomain structure. So, if you’re serious about security and have any subdomains at all,
you absolutely need to include this directive
. It’s the difference between basic protection and robust, holistic security for your entire digital footprint. It makes your security posture much stronger and more consistent across the board.
Why You
Need
includesubdomains
for a Stronger Security Posture
Let’s be real, guys, security isn’t just a nice-to-have; it’s a
must-have
. In today’s digital landscape, data breaches and cyberattacks are unfortunately all too common. Implementing HSTS with the
includesubdomains
directive is a critical step in fortifying your website’s defenses. Imagine you have a main website secured with HSTS, but your
api.yourdomain.com
is still accessible via HTTP. A savvy attacker could target your API, intercepting requests and potentially stealing API keys or sensitive user data that your main site relies on. This could lead to a catastrophic breach, damaging your reputation and costing you dearly. The
includesubdomains
directive eliminates this risk by ensuring that
all
subdomains are forced to use HTTPS. This creates a consistent and impenetrable security layer across your entire domain. Furthermore, browsers that support HSTS will proactively check if a domain has submitted a preloaded HSTS list entry. If your domain and its subdomains are on this list, browsers will already know to connect via HTTPS even on the
very first visit
, before any HSTS header is even received. This significantly reduces the chance of an initial insecure connection. It’s like having your security clearance already approved before you even arrive at the building. This is especially crucial for user-facing subdomains like
mail.yourdomain.com
or
support.yourdomain.com
, where user credentials or personal information might be handled. By enforcing HTTPS on these, you’re protecting your users directly and building trust.
Ultimately,
includesubdomains
isn’t just a technical setting; it’s a commitment to protecting your users, your data, and your brand’s reputation.
It’s about closing all potential gaps and ensuring that every interaction with your domain is as secure as possible. It’s a simple addition with profound security implications, making your overall security posture significantly more robust and trustworthy in the eyes of both users and search engines.
How to Implement HSTS with
includesubdomains
Alright, let’s get down to business: how do you actually
add
this
includesubdomains
directive to your website? It’s actually quite straightforward, and it all happens in your web server’s configuration. The HSTS policy is communicated to the browser via an HTTP response header. You’ll need to access your web server’s configuration files to add this header. The exact location and syntax depend on your web server software (like Apache, Nginx, or IIS) and your hosting environment.
For Nginx Users:
If you’re running Nginx, you’ll typically add the header to your
nginx.conf
file or a site-specific configuration file within the
sites-available
directory. You’ll want to put this inside your
server
block, usually within the
location /
block, or at the top level of the
server
block.
server {
    listen 443 ssl;
    server_name example.com;
    # ... other SSL configuration ...

    add_header Strict-Transport-Security "max-age=31536000; includeSubDomains; preload" always;

    # ... rest of your configuration ...
}
In this example,
max-age=31536000
sets the policy for one year (31,536,000 seconds). The
includeSubDomains
directive ensures the policy applies to all subdomains, and
preload
is an optional but highly recommended directive that allows you to submit your domain to browser-specific HSTS preload lists. The
always
parameter ensures the header is added regardless of the response code.
For Apache Users:
For Apache, you’ll typically modify your
.htaccess
file or your virtual host configuration file. Ensure you have the
mod_headers
module enabled.
<IfModule mod_headers>
    Header always set Strict-Transport-Security "max-age=31536000; includeSubDomains; preload"
</IfModule>
Again,
max-age
is set to one year, and
includeSubDomains
and
preload
are included for comprehensive security. The
always set
directive ensures the header is sent on all responses.
For IIS Users:
In Internet Information Services (IIS), you can configure custom HTTP response headers through the IIS Manager or by editing the
web.config
file.
<configuration>
    <system.webServer>
        <httpProtocol>
            <customHeaders>
                <add name="Strict-Transport-Security" value="max-age=31536000; includeSubDomains; preload" />
            </customHeaders>
        </httpProtocol>
    </system.webServer>
</configuration>
Remember to replace
example.com
with your actual domain name and adjust the
max-age
value as needed. It’s crucial to test your configuration after making changes to ensure the header is being sent correctly. You can use online tools or your browser’s developer console (under the Network tab) to check the response headers for your site.
The
preload
Directive: Taking Security a Step Further
While we’re on the topic of making your HSTS implementation as robust as possible, we
have
to talk about the
preload
directive. You saw it in the examples above, right? This isn’t just some random addition; it’s a powerful tool that takes your HSTS security to the next level. So, what exactly does
preload
do? When you include
preload
in your HSTS header, you’re essentially signaling your intent to have your domain included in the
HSTS preload lists
that major browser vendors maintain. These lists are built directly into the browsers. Think of it like getting your website added to a VIP list that browsers consult
before
they even try to connect to your site. Even on the very first visit someone makes to your site, if your domain is on a preload list, the browser will
already know
to use HTTPS and will automatically upgrade the connection. This is incredibly powerful because it bypasses the need for the browser to even receive an HSTS header from your server on that initial visit. This completely eliminates the possibility of an initial insecure HTTP connection, which is often the weakest point in the security chain. To get your domain on these preload lists, you typically need to meet certain criteria: your site must serve a valid certificate, all HTTP traffic must be redirected to HTTPS, and your HSTS header must include
max-age
(a sufficiently large value, usually at least a year),
includesubdomains
, and
preload
. You then submit your domain to services like
hstspreload.org
. Once accepted, your domain gets baked into future browser releases. It’s a fantastic way to ensure that even new users or users clearing their browser cache are immediately protected.
Using
preload
in conjunction with
includesubdomains
provides the most comprehensive and immediate HSTS protection available.
It’s the gold standard for securing your entire web presence against even the most sophisticated attacks from the very first connection.
Common Pitfalls and How to Avoid Them
Implementing HSTS, especially with
includesubdomains
and
preload
, is fantastic, but like anything in tech, there are a few common pitfalls you might stumble into. Being aware of these can save you a lot of headaches down the line. The biggest one?
Forgetting that
includesubdomains
applies to
all
subdomains.
This means if you have a subdomain that you
intentionally
want to keep accessible over HTTP for some very specific, usually legacy, reason (though this is highly discouraged), adding
includesubdomains
will break it. Make sure
all
your subdomains are ready and configured to serve content securely over HTTPS before you flip the HSTS switch with
includesubdomains
. Another common mistake is setting the
max-age
too low. If you set it to a short period, like a day or a week, browsers will frequently forget the HSTS policy, reducing its effectiveness. Aim for at least one year (
31536000
seconds), and ideally longer, as you gain confidence in your HTTPS setup. Also,
don’t enable HSTS or
includesubdomains
until you are 100% sure your HTTPS setup is flawless.
If your certificate is invalid, expires, or your HTTPS configuration has issues, users trying to access your site will get scary security warnings that they can’t bypass, potentially leading them to abandon your site entirely. It’s best to get your HTTPS working perfectly first, test it thoroughly, and
then
implement HSTS. Finally, remember that HSTS is a browser-level setting. If a user visits your site over HTTP
before
the HSTS header is sent and cached, they are still vulnerable. This is precisely why the
preload
directive is so crucial – it mitigates this risk by getting your domain on the browser’s built-in preload list. Always test your implementation thoroughly using browser developer tools or online HSTS checkers to ensure the header is being served correctly and that all subdomains are responding as expected.
Patience and thorough testing are your best friends here.
Don’t rush the process; ensure everything is solid before making the switch permanent. This careful approach will prevent unexpected downtime and ensure a smooth, secure experience for all your users across every part of your domain.
Conclusion: Secure Your Whole Digital Estate!
So there you have it, folks! We’ve journeyed through the essential world of HTTP Strict Transport Security and zeroed in on the power-packed
includesubdomains
directive. It’s clear that if you’re serious about protecting your website and your users, implementing HSTS with
includesubdomains
is not just recommended; it’s practically mandatory, especially if you utilize subdomains. It’s the simplest way to ensure that every corner of your web presence, from your main domain down to the most obscure subdomain, is shielded by the security of HTTPS. By forcing browsers to
only
use secure connections, you’re erecting a formidable barrier against man-in-the-middle attacks, protocol downgrade shenanigans, and other nasty exploits. Adding the
preload
directive takes this security to an even higher echelon, ensuring immediate protection from the very first visit. Remember to configure this at your web server level, test rigorously, and ensure your entire subdomain infrastructure is HTTPS-ready
before
you deploy. Don’t let a weak subdomain be the Achilles’ heel of your otherwise secure website.
Embrace HSTS with
includesubdomains
and
preload
to build a truly robust, trustworthy, and secure online experience for everyone.
Stay safe out there, and happy securing!
